ThreadTest:
Lets loot at a sample program for better understanding of threads. It was written in python extension C( calling C function from python). This is an example for parallel processing. So I made a program to print string ( some words or sentence) after every 4 seconds. But the goal is to modify the default time of printing( delay_time) & string to be printed ( command) without stopping the process (while the program is running). There arise a concept of thread. I used two mechanisms in the code.
1. Global Interpreter Lock (GIL)
2. Mutual Exclusion Lock(MUTEX Lock)
Global Interpreter Lock (GIL) is a mechanism used in computer language interpreters to synchronize the execution of threads so that only one thread can execute at a time. An interpreter which uses GIL will always allow exactly one thread to execute at a time, even if run on a multi-core processor.
The Python interpreter is not fully thread-safe. In order to support multi-threaded Python programs, there’s a global lock, called the global interpreter lock or GIL. Therefore, the rule exists that only the thread that has acquired the GIL may operate on Python objects or call Python/C API functions.
This is so common that a pair of macros exists to simplify it:
Py_BEGIN_ALLOW_THREADS
… Do some blocking I/O operation …
Py_END_ALLOW_THREADS
Mutual Exclusion Lock(MUTEX Lock):
Probably the most commonly used synchronization option to accessing the shared data. Simply, it used to synchronize threads so that only one thread can make modifications to shared data at any given time.
This process is done by two operations,
m.acquire() # Acquire the lock
m.release() # Release the lock
Only one thread can successfully acquire the lock at any given time . If another thread tries to acquire the lock when its already in use, it gets blocked until the lock is released. So it avoids race condition.
Explanation:
Here, I am calling c function from python. To pass the variable to the process , i need to run the process(main) as thread. So i can pass the variable to the main without affecting the program execution. In order to do that i need to create three more python objects to set the value of delay_time, command & quit command.
Program Code:
#include <Python.h>
#include <windows.h>
#include <time.h>
#include <pthread.h>
#include <stdio.h>
#include <stdlib.h>
// Global Variables
int delay_time = 4;
char command_py[10000] = {};
int i;
pthread_mutex_t command_py_mutex = PTHREAD_MUTEX_INITIALIZER;
int quit = 0;
// Creating Python Object
static PyObject* ThreadTest_print(PyObject* self)
Python Object:
In the function ThreadTest_set_st(), I declared a character pointer instead of character array is to avoid the the clash between the c and the python while while allocating the memory for the local variable (command_local). So i created the pointer for that local variable in which python allocates the memory space.
I also created ThreadTest_set_dt function to prove, simply getting the user input directly to the variable ‘delay_time‘ could not work at all. So one need to be more careful when creating this sort of functions.
Compilation:
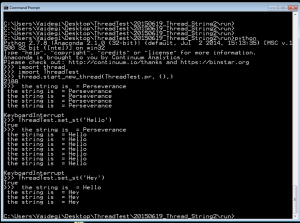
First, i need to run main function as thread. Then, i can pass the string to the main function using following procedures in python terminal.
import Threadtest // this used to import the module
import thread // this used to import the thread
thread.start_new_thread(ThreadTest.pr, (),) // to start the main as thread
ThreadTest.set_st(‘ Hello’) // to pass the string
ThreadTest.set_st(‘ q’) // to quit the program
Since, there i made mistake in the ThreadTest_set_dt function i could not call that one. When we modify the ThreadTest_set_dt function according to latter, then this code will print the both function’s arguements .


