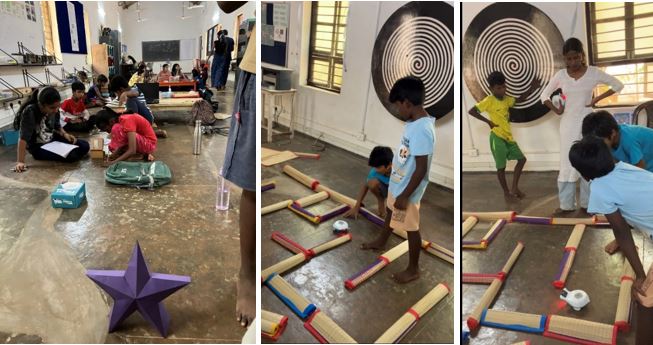
Using gears for ratios

7th in Udavi children were learning ratios. We used a crank fan and used a spur gear system (in the pictures) to spin the blades around and make a breeze. The faster the fan turns, the stronger the breeze. Using a big gear to turn a small gear makes it easier to turn the blades quickly. For one full turn of the big gear, the small gear spins around many times. How many times it spins depends on the number of teeth both gears have (gear ratio). The spur gears turn the blades much faster than if you turned the blades directly with a crank. Using this crank fan, we showed 1:1 ratio up to 1:5. Showing it visually gave children the confidence to understand the ratio concept.

We gave the students another gear pair as an example for further examination: If the 75-tooth driver gear rotates 3 times, how many times will a 15-tooth driven gear rotate? What if the 75-tooth driver gear rotates 5 times? By focusing on the relationship between the gears. In this case, the 15-tooth gear rotates 5 times for every rotation of the 75-tooth gear. This is true regardless of the number of times the 75-tooth gear rotates. This brought us closer to the gear ratio of a 75-tooth driver gear and a 15-tooth driven gear and what they do in class as the gear ratio is 1:5.

Children understood that.

A colon is often used to show a gear ratio:

gear ratio = rotations of a driver gear: rotations of a driven gear.

Children when seeing it visually it gives confident to build different numbers to find the ratio. The session was interesting for the children. Children sheared their learnings to each other and started working in peers.

A session with Last School Children

On the 28th of July, the STEM Land team visited Last School for a session with them. The facilitating team Prabhaharan, Arun, and Illamkathir along with the last school children worked on RTL tools, seven segment displays, Cast puzzles, and the homopolar motor.

The session started with a few minutes of meditation. The team started the session with the Radical transformational leadership tool that helped children identify the universal values they stand for. Then the team helped the children identify their socialized fears and how courage is not the absence of fear, but the ability to act despite fear.

Later, we learned about the Seven segment Display and its primary uses. Our team explained how to use a multimeter and analyze the SSD and showed a demo. With that reference, the children worked on it and completed it.

Later, the working of the homopolar motor was demonstrated to the children. A Homopolar motor is one of the simplest motors built because it uses direct current to power the motor in one direction. The magnet’s magnetic field pushes up towards the battery and the current that flows from the battery travels perpendicular to the magnetic field. Students had a great time making it.

The whole session was engaging, encouraging, and enlightening. It was a great learning for everyone and we thoroughly enjoyed working with them.

Students from Last School requested to come to STEM Land on Saturdays to learn programming like Scratch and Python.  We will start such sessions soon.

LAST SCHOOL STUDENTS VISIT STEMLAND

On the 14th of July students from the Last school, Auroville visited STEMLAND. The forty students accompanied by the teachers enjoyed their afternoon session by exploring STEMLAND.

The arrangements were done by the STEMLAND team. There were 8 stalls which include

  1. Mindstorms
  2. Games and puzzles
  3. Science projects
  4. Makey-Makey
  5. Arduino
  6. Electronics
  7. Scratch programming
  8. 3-D printing.

Mindstorms:

Mindstorms is a hardware and software structure that develops programmable robots based on Lego building blocks. Each version includes computer Lego bricks, a set of modular sensors and motors, and Lego parts from the Technic line to create the mechanical systems. The system is controlled by the Lego bricks.

Games and puzzles:

Logic and strategy games were present. They include Abalone, Gobblet, Quads magnetic, Aadu Puli (Puli Meka), Linja, Quarto, Quoridor, Othello and Eternals were put on view to play. Puzzles like Rubik’s cube, Cast puzzles, and holograms were displayed to solve and play with.

Science Projects:

Science projects based on concepts were exhibited. The exhibits include

  • Magnetic levitation
  • Electromagnetism
  • Acid-base indicator
  • Dc electric motor model
  • Crank’s model
  • Lungs- diaphragm model
  • Magnetism- properties.
  • DIY microscope
  • DIY headphone
  • Series and parallel connection
  • Lights color – arithmetic model.

These models were made using the Arvind Gupta toys which are made of scrap materials.

Makey – Makey:

Makey Makey is an invention kit by the MIT media lab. With Makey Makey, everyday objects are transformed into touchpads empowering students to interact with computers as creative tools. The computer becomes an extension of their creativity, fostering imaginative play and discovery.

“Makey Makey” is a play on words – students having the ability to Make their Keyboards (“Ma-Key”). The mundane and boring keyboard is replaced by any object that conducts electricity – pie pans, Play-Doh, bananas, and even potted plants – the list goes on.

The projects can be coded by scratch and use the Makey Makey kit as a joystick controller.

Arduino:

Arduino is an open-source hardware and software that can be used for designs. It is a microcontroller and microcontroller kit for building digital devices. It can be programmed and built using the Arduino software. Exhibits include a Distance measurement kit, Automated street light was displayed.

Electronics:

The field of electronics is a branch of physics and electrical engineering that deals with the emission, behavior, and effects of electrons using electronic devices. Projects like Automatic street light controller and automated sound sensor control model, Automatic dustbin were displayed.

Scratch programming:

Scratch is a visual programming language that allows students to create their own interactive stories, games, and animations. As students design Scratch projects, they learn to think creatively, reason systematically, and work collaboratively.

3-D printing:

A machine allows the creation of a physical object from a three-dimensional digital model, typically by laying down many thin layers of a material in succession. The models are designed using software called Tinkercad and converted to the printing g code to feed to the machine using Ultimaker CURA software. This paves for creative models.

The visit session was facilitated by Dr.Sanjeev Ranganathan and the team of STEMLAND. The session started with a few minutes of concentration meditation and a few words about what we stand for, a casual talk on the similarities and differences between the last school and STEMLAND. Students had to choose any two stalls they can spend time on. Some of them wanted to explore all the activities.

Students and facilitators had a great time exploring. Few of them made hands-on projects using the kits provided. They played strategic games and got fascinated by them. It was a pleasure to have them in STEMLAND. The team had wonderful learning, growth, and fun having them.

Vaughn cube

Vaughn cube is for children who find visualization easier rather than memorizing the multiplication tables.

Elements of Vaughn cube:

  • Numbers.
  • Pictures.
  • Colours.

Construction of Vaughn cube:

  • 4 sides = 4 walls.

Each wall has a specific color.

  • Numbers are arranged as follows:

Odd numbers- Diagonal.

Even numbers- In the middle.

  • Pictures-Specific arrangement based on the sound they make.

For eg: Tuna- T, and n.

              Nose -N and s.

Working with Vaughn cube:

  • Create a room as shown in the image with the numbers marked.
  • Ask children to practice the objects along with their position on which number the object comes.
  • Make it clear for children to see that it is the same object between 3 to 4 and 4 to 3.
  • Let children study the base picture and introduce the different words.
  • It’s important for the children to know the orientation of the room as they will remember objects based on their location rather than the numbers they are in between. This is how the mind castle works.
  • There are different charts for tables 3,4 5, etc.


  • Introduce all the images in the Vaughn cube and ask children what they are along with the sounds.
  • Make children practice the names of the objects and see if they can identify the sounds while saying the names of the objects.

Eg: Tuna-t,n

Deciphering the sounds and numbers:

Map the numbers from 0-9 with the sounds.

  • 1 looks like t.
  • N written sideways as z looks like 2.
  • M written sideways looks like 3 especially small m.
  • Cursive r has a hidden 4 in it.
  • L is logged the bar on top of 5.
  • Ch written with c inside h looks like a 6.
  • Cursive k has a 7 inside it.
  • Cursive f looks like an 8.
  • P reversed looks like a 9.
  • Practice making children map the numbers with the sounds for all the objects.
  • See if children can say the numbers instead of the object name between the two numbers/on top of the number in the room.

Vaughn cube can help children learn multiplication as well as division effectively by visualizing.

A Session with Mr. Thiyaragaraja Kumar

An enthusiast researcher Mr. Thiyaragaraja Kumar visited STEM land on 20th June 2022 to exhibit the projects made by him and to inspire young minds.  He is an inspiring, energetic, curious person who makes projects, and teaches and guides children to invent projects. He plans to take project-based learning for the children.

The projects include a wireless charging unit, a quiz breaker, and sun-directed solar panel motor drive equipment. The wireless charging unit works based on the principle of mutual induction. The Quiz breaker model is based on relays. It finds its Industrial usage mainly in industry automation and helps in finding the valve tripping or if there is any fault. Using this model, faults in the high boiler plants can be easily found and repaired accordingly.

The sun-directed solar panel motor drive model was interesting and inspiring. It works based on the principle of movement of the sun.  this exhibit was presented at the Japan conference in 2015. According to the movement of the sun the solar cell panel moves which is driven by the motor using an LDR. This model gained more attention than other models.

He had a session with our team and explained the working methodology of the exhibits. He also enlightened the people on the topics of BCD, the Fibonacci series, Pascal’s triangle (Mahameru), Mehruprasta, Base10 calculations, Base16, and Base20 calculations.

He threw light on various number systems like the Roman number system, Greek number system, Mayon number system, and Egyptian number system. He also elucidated the shortcuts in simplification, Vedic math which is used in quantitative aptitude. 

The whole session was inciting, encouraging, and enlightening. Mr. Thiyagarajan enjoyed sharing his exhibits, got fascinated with the framework of STEM land, and wanted to support us in encouraging children to invent more projects.

Reflections from the team: 

  1. The session was inspiring. We learnt more facts and it was interesting too. 
  2. It motivated us to make more projects on automation.
  3. It was interesting. The BCD chart was good. The Sun directed solar panel equipment was stunning. It stirred up to do more research on it.

Boyle’s Law

Boyle’s law is a gas law that states that the pressure exerted by a gas (of a given mass, kept at a constant temperature) is inversely proportional to the volume occupied by it. In other words, the pressure and volume of a gas are inversely proportional to each other as long as the temperature and the quantity of gas are kept constant. Boyle’s law was put forward by the Anglo-Irish chemist Robert Boyle in the year 1662.

For a gas, the relationship between volume and pressure (at constant mass and temperature) can be expressed as 

P (1/V)

where P is the pressure exerted by the gas and V is the volume occupied by it. This proportionality can be converted into an equation by adding a constant, k.

P = k*(1/V) PV = k

The pressure v/s volume curve for a fixed amount of gas kept at constant temperature is illustrated below.

Experiment using Thinktac kit:

This gas law describes how the pressure of a gas tends to increase as the volume of the container decreases. We use a syringe and balloon to understand the phenomenon.

Steps:

  • Take a syringe of 60 ml capacity and remove its plunge.
  • Take a small balloon.
  • Blow a small amount of air into the balloon and hold at its neck tightly with your fingers.
  • Insert the balloon through the syringe’s open end and remove it to check whether the balloon can enter freely inside the syringe or not.
  • Now, tie a tight single knot at the balloon’s neck. Ensure that there is no air leakage.
  • Insert the balloon into the syringe to the tip. Insert the plunger back to close the open end.
  • Initially, push and set the plunger at the 30 ml reading on the syringe, with the tip of the syringe open. Now, tightly close the tip of the syringe with your finger.
  • Press the plunger hard as much as possible and observe what happens to the balloon inside.
  • After you reach the optimum level, release the plunger and continue to observe.
  • Now, pull the plunger and set it at the 30 ml reading on the syringe again, with the tip of the syringe closed.
  • Now, pull the plunger to the open end of the syringe and observe what happens to the balloon.


Filling water in the syringe:

  • Take about 100 ml of water in a cut bottle container and the syringe with the balloon.
  • Push the plunger till it reaches the balloon.
  • Dip the tip of the syringe in the water and pull the plunger till the 60 ml reading fills the water.
  • Hold the syringe with the syringe’s tip positioned upward as shown. Shake the syringe and adjust it to push air above the water level.
  • Now, push the plunger slowly for the air above the water level to escape through the tip of the syringe.
  • Push the plunger to remove the excess water into the container, till the plunger reaches the 40 ml reading on the syringe.
  • Now, push and pull the plunger to the closed end of the syringe and observe what happens to the balloon.


Preparing the water balloon:

  • Take another small balloon.
  • Use the same 60 ml syringe and draw about 10 ml of water from the container.
  • Empty the syringe before filling it with 10 ml of water.
  • Now, insert the syringe’s tip into the mouth of the balloon and press the plunger to add water to the balloon’s neck.
  • Pinch the balloon’s neck, at the point where the water is present, to prevent the air bubbles from entering the balloon.
  • Now, twist the balloon’s neck, two times, and tie a knot tightly.
  • Insert the balloon -filled with water into the syringe and close the syringe’s open-end by inserting the plunger.
  • Position the plunger at the 30 ml reading on the syringe.
  • Now, close the syringe’s tip and press the plunger to the maximum possible level. Release the plunger and then pull it to the open end of the syringe.

Observe the difference when the balloon filled with water is within a closed system of the syringe.

We observe in both cases, that when the pressure increases the volume decreases. Similarly, the volume increases when the pressure decreases.

ARITHMETIC PROGRESSION USING VISUAL MATHEMATICS

An arithmetic progression or arithmetic sequence is a sequence of numbers such that the difference between the consecutive terms is constant.

For example, the series of natural numbers: 1, 2, 3, 4, 5, 6… is an Arithmetic Progression, which has a common difference between two successive terms equal to 1 (2 -1). Even in the case of odd numbers and even numbers, we can see the common difference between two successive terms will be equal to 2.

This can be observed visually using a graph. If an arithmetic sequence is plotted in a graph lies on a straight line. There is a finite distance between points.

For plotting in a graph, the sequence is written as in the following table.

Sequence of numbers: 3,5,7,9, 11, …

Term(x)

Number of squares(y)

Point(x,y)

Formula /Pattern

1

3

(1,3)

3=2(1-1) +3

2

5

(2,5)

5=2(2-1) +3

3

7

(3,7)

7=2(3-1) +3

4

9

(4,9)

9=2(4-1) +3

5

11

(5,11)

11=2(5-1) +3

6

13

(6,13)

13=2(6-1) +3

7

15

(7,15)

15=2(7-1) +3

.

.

.

.

.

.

.

.

n

.

.

tn=a+(n-1) d


The plotted point of an AP is shown below:

Notations in Arithmetic Progression:

In AP, we will come across some main terms, which are denoted as:

  • First-term (a)
  • Common difference (d)
  • nth term. (an)

First Term of AP

The AP can also be written in terms of common differences, as follows;

where “a” is the first term of the progression.


a, a + d, a + 2d, a + 3d, a + 4d, ………., a + (n – 1) d

Common Difference in Arithmetic Progression

Suppose, a1, a2, a3, ……………. is an AP, then the common difference “d” can be obtained as;

d = a2 – a1 = a3 – a2 = ……. = an – an – 1

Where “d” is a common difference. It can be positive, negative, or zero.

The nth term of an AP

The formula for finding the n-th term of an AP is:

an = a + (n − 1) × d

where

a = First term

d = Common difference

n = number of terms

an = nth term

In the graph, the slope of the line formed by the arithmetic progression is equal to the common difference in Arithmetic progression.

Sum of n terms of an arithmetic progression:

The sum of n terms of an AP can be easily found using a simple formula which says that, if we have an AP whose first term is a and the common difference is d, then the formula of the sum of n terms of the AP is

Sn = n/2 [2a + (n-1) d]

The proof of the sum of n terms can be visualized and derived using the area concept. This can be implemented and observed in GeoGebra.

Suppose we arrange the terms in the AP as shown in the figure we can calculate the area to find the sum of the first n terms in an AP.

This is can be done in two methods:

1.Using the area of the trapezium

2.Using the area of the rectangle.

1. Using the area of the trapezium:

When the terms in the AP are arranged as shown in the figure we can observe that it forms a trapezium. to find the sum of the first n terms in an AP the area of the trapezium can be calculated which gives the result of the sum of the first n terms.

2. Using the area of the rectangle:

Likewise, the terms in the AP can be arranged in such a way that the tilted arrangement and the regular arrangement of the terms form a rectangle as shown in the figure. To find the sum of the first n terms in an AP the total area of the rectangle can be calculated and divided into half to get the required area which gives the result of the sum of the first n terms.

Finding the equation of a line using the arithmetic progression:

Lets take the sequence 3,5,7,9,11…..The nth term is taken as x and its number of squares as y.

As we know tn can be expressed as tn=a+(n-1)d.

i.e., y=tn=a+(n-1)d

We know that a=3,common difference is 2. Substituting we get

y=3+(x-1)2

y=3+2x-2

y=2x+1 ———- > Equation of the line.

General equation of a line is y=mx+c.

Here we can observe that m= slope =2 = common difference.

c=1 = Intercept (A point at which the given line cuts the y axis).

In an arithmetic progression intercept means the value of sequence, when x=0.

This can be observed in the graph given below.

+


MAKEY MAKEY

Makey Makey is an invention kit by the MIT media lab. With Makey Makey, everyday objects are transformed into touchpads empowering students to interact with computers as creative tools. The computer becomes an extension of their creativity, fostering imaginative play and discovery.

“Makey Makey” is a play on words – students having the ability to Make their Keyboards (“Ma-Key”). The mundane and boring keyboard is replaced by any object that conducts electricity – pie pans, Play-Doh, bananas, and even potted plants – the list goes on.

The heart of Makey Makey is its circuit board that connects to a computer via a USB cable. Building circuits that can be used like a joystick or a keyboard key allows users with no coding experience to use Makey Makey to learn, experiment, and invent.

Makey Makey paves the way for “Integrative STEM Education”. “Integrative STEM education” refers very specifically to instructional approaches that intentionally situate the teaching and learning of science, technology, engineering, and /or mathematics concepts and practices in the context of hands-on engineering, designing, and making.

The Makey Makey kit includes the Makey Makey board, a USB cable, seven alligator clips, six connector wires, and an instruction sheet.

Working of Makey-Makey:

  • Plug in the USB of Makey Makey to the computer.
  • Connect to Earth-Connect one end of an alligator clip to “Earth” on the bottom of the front side of Makey Makey.
  • Hold the metal part of the other end of the alligator clip between your fingers.
  • While you are still grounded, touch the round “Space” pad on the Makey Makey. A green light should appear on the Makey Makey, and the computer will “think” the spacebar was pressed. Also, complete the circuit by connecting another alligator clip to “Space.
  • Experiment by turning various items, objects, or substances into a computer key.

Using Makey Makey with scratch:

Scratch is a programming language where interactive stories, games, and animations can be created. The Chase game is an example of a program made using the Makey Makey. The game is played with the arrow keys and the notes can be remixed for an array of versions.

This chasing game was coded from scratch and used the Makey Makey kit as a joystick controller.

Reflection from Sri Bhavani:
From the Makey Makey hands-on projects with children, they have learned about conducting and non-conducting materials. Current doesn’t flow in an open loop. They learned the open-loop and closed-loop of a circuit. x,y coordinates while moving the sprite.

Piano using Makey Makey.

Aadu Puli Attam

The Lambs and Tigers Game locally referred as the Game of Goats and Tigers (TamilAadu puli aatamTeluguMeka puli aataKannadaAadu Huli aata) or Pulijudam, is a strategic, two-player (or 2 teams) leopard hunt game that is played in south India. The game is asymmetric in that one player controls three tigers and the other player controls up to 15 lambs/goats. The tigers ‘hunt’ the goats while the goats attempt to block the tigers’ movements.

  • This is the ancient game played in southern part of India especially in the states of Andhra PradeshKarnataka and Tamil Nadu.
  • The board is drawn on parapet inside the mahadwara of the Chamundeshwari temple atop Chamundi Betta (hill) in Mysore, Karnataka
  • This game helps people to develop strategy and concept of teamwork by teaching that even though weak, if united, one can vanquish the stronger enemy as a team.
  • This game is very similar to the Korean game of Yut.

Buzzer and LED c connection using Switch

Children  in Deepanum have been learning simple electronics once in a week . They have been learning it for almost 1 and half month. There are about 15 to 20 children. In this one child  doesn’t  show interest and he would do some thing else but he wont disturb the class. All the other children work together and does something interesting. Last class we were building a circuit with switch, battery, LED and resistor. I drew the circuit diagram in the black board and asked the children to connect . All the children were able to complete the circuit on their own phase. This boy got inspired and he also started to engage in the class . He built his own circuit and  without bread board. As a teacher when I asked him to use bread board he didn’t listen to me. At that time i still my self and noticed that if in ask him to use bread board he would not do it  and the learning will stop  at that moment itself so I let him on his way and he was able to complete his circuit .  The session was so good that I realized that children are able to build the circuit on their own. I also realized that my contribution to this children growth is valuable.