Raspberry Pi Documentation

~Saranya

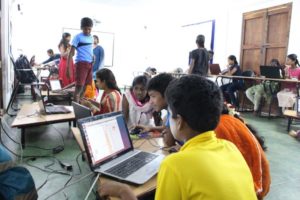
The Raspberry Pi is a low cost, credit-card sized computer that plugs into a computer monitor or TV, and uses a standard keyboard and mouse. It is a capable little device that enables people of all ages to explore computing, and to learn how to program in languages like Scratch and Python.

What you will need

The Raspberry Pi ships as just the single-board minicomputer. There are a few additional components you will need before you can get started. So, when making your purchase, keep in mind that you’ll need the following extras.

  • Raspberry Pi zero
  • 5V micro-USB power supply
  • USB keyboard
  • USB mouse
  • microSD card(8GB or 16GB)
  • A monitor that supports HDMI
  • An HDMI cable
  • Wi-Fi dongle

Step 1: Reformat your microSD card

When the reformat is complete, you will get a notification window. Select OK to close the window.

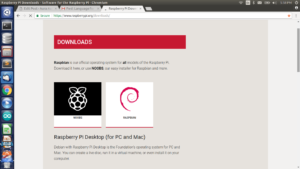
Step 2: Download the Raspberry pi 

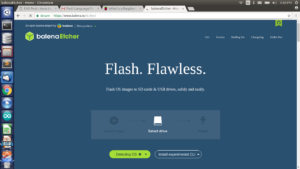
There is two different version that we learnt one is Terminal version another one is Desktop version. Here is the link to download Terminal version and Desktop version:  https://www.balena.io/etcher/      and  https://www.raspberrypi.org/downloads/

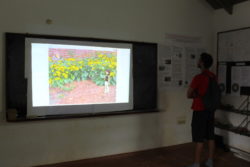
Here is the image for the page to download the Raspberry pi.

Terminal Version:

After installing it will ask your username and password. Then check your IP Address by typing this command if config ……

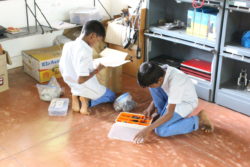
Step 3: Set up your Raspberry Pi

  • Insert the microSD card into the card slot on the underside of the Raspberry Pi.
  • Plug the USB keyboard into one of the USB ports.
  • Plug the USB mouse into one of the USB ports.

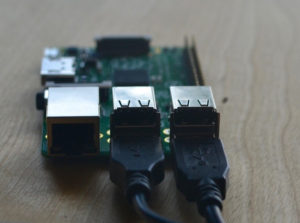
  • Turn on your monitor.
  • Plug the HDMI into the monitor.
  • Connect the other end of the cable into the Raspberry Pi.
  • Connect the power supply to the Raspberry Pi.

Once the installation process is finished, Raspbian will automatically begin to boot(Desktop version).

Step 5: Configure your Raspberry Pi

When Raspbian begins to load a bunch of lines of code will appear. This will continue until the boot process has completed. Then, the Raspbian Home screen will appear. You will need to configure your Raspberry Pi system in order to add your location, date, and time.

  • Click Menu in the upper left corner of the screen.
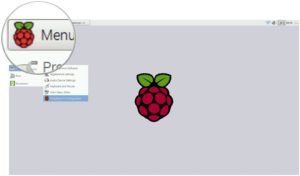
  • Select Preferences in the dropdown menu.
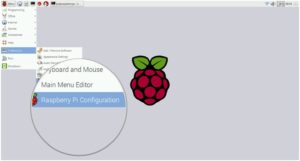
  • Select Raspberry Pi Configuration under Preferences.
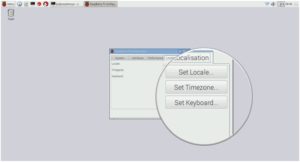
  • When the configuration window appears, click on the Localisation tab.
  • Click on Set Locale… to set your location.
  • Click on Set timezone… to set your local time.
  • Click on Set Keyboard… to set your keyboard language.

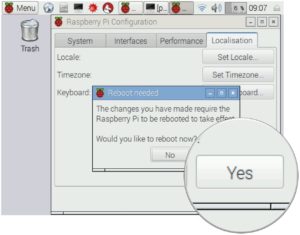
  • Reconfiguring your Raspberry Pi will require a reboot. When the reboot window appears, click Yes to continue.


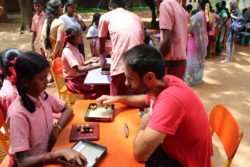
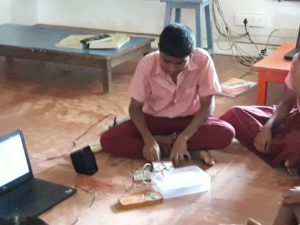
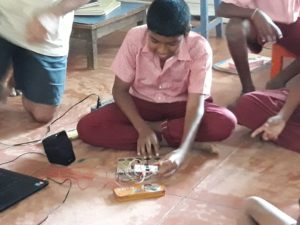
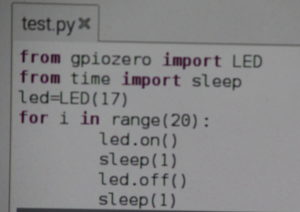
We did LED blink by connecting IP address. We accessed that LED in remote location it was like if we forgot to turn off the A/C. Wherevr we are by using raspberry pi we can turn it off the A/C. Here is the code for turn on and turn off the LED.

Once the terminal version installation process is finished, Raspbian will automatically ask username and password(Terminal version). Remining process please follow this video.


Reflections from SFNE workshop(Stewardship For New Emerging)

~Saranya

Session -1

1. When I deeply listen to others I was able to ground myself it made me relaxed and It made others also to be relaxed.

2. From the movie(12 angry men) I noticed they were talked about fact and interpretation.

3. Whenever I get complaints from someone I realized It was an good opportunity to learn and also I noticed when I am complaining to somebody I felt like I really care about the things that’s why I was complaining to somebody.

4. I realized that within 2 minutes I can make others to put in their fear at the same time I can make others to put in their stand.

Session-2

1. While doing the fact and interpretation tool I noticed myself is that if I give importance to the stories I was unable to find a solution (what to do next) at the same time when I give Importance to the fact I was able to know what to do next.

2. I have realized that moment to moment I was unable to be in integrity.

3. While doing the breakdown to breakthrough I noticed through my wild idea I was able to see what will be my output and outcome for my project. For breakdown to breakthrough I was able to connect with my synergistic operational.

4. I noticed there is relationship between fact interpretation and judgment and discernment.

5. I learnt what is the purpose for forgive without condoning.

6. While doing the overload and overwhelm I have realized that when I felt overload I was able to separate things according to the priority and also I can get help from others. When I am in overwhelm I did know what to do and also I did know whom to ask help. The overwhelm is just a feeling that I noticed it it was stayed in only few minutes then it’s gone when I went to do for another work.

7. When I was doing the conversation for completion I realized what was I missed for past conversation.

7. Whatever the thing I did in the past this session-2 helped me to notice and name it.

Learning scratch

The 7th graders (2018-2019 batch) had stepped in for their Mathematics class for the first time in STEMland this year.  They took their own time and became familiar with filling their weekly plan and updates on the laptops. They saw their seniors work on projects and were eager to learn, some of them took the courage to approach and did learn a few blocks in scratch and got the feel of it, but had a little hard time on expanding their code. They often started to play around with the back ground painting and changing colors of sprites, but the coding part was still a little confusing.

The previous batches had a guidance course into scratch and that had kicked started their projects.  I had thought to do something of this type and get the current batch flexible with programming too. Then as a team we decided to create diversity in the class and put up an announcement for all those who were interested in attending the course to sign up. 5th graders from Isaimambalam had shown interest and 8th graders from Udavi along with the interns in STEMLand the course began.

All the participants were eager to code and make the computer do what they want rather the vice versa. Pairs were made on a mix up of boys and girls, young ones and elders, interns and students. Each day started with a focused goal and how to broaden it when attained and make the program more flexible. Girls were eager in writing their scripts and explaining their program at the end of day or beginning of the next session on the main screen. Some children did not want to move on to the next task unless they had completed the current one to their satisfaction, and took extra time and involved in making their program more stable.

Through the course the children had learnt to use the pen function and through this draw regular shapes. Once they knew the basics they made the same program dynamic and used ‘for loops’ to show all the shapes starting from an equilateral triangle to square, pentagon, hexagon, heptagon, octagon, nonagon, and decagon.

The children had learnt importing and exporting of sprites (arc function to draw arcs in practical geometry, writing sprites to print on the screen)

Then they were divided into teams and created a game based on sensing objects or colors (similar to a maze game but when sprite touches a wall or unwanted object the game resets)

The children were given feedback forms, and the reflections were showing that they all are more confident now than before in doing projects with scratch. They also mentioned as teams they were able to learn and help each other more.

Towards the end all children had made a number of projects to show what they had learned through the course. This was a stepping stone for them to continue and make projects based on their curriculum to project their mastery over a concept.

At present the children have come up with new projects, e.g. Abinash, Shakthikannan have created projects in measurements. While Murali took it to the next level and is doing a project from out of his syllabus (a+b+c)^2. This has inspired others and Guna sundari, Yuvan, Jeeva, Jannani, Anisha have started to expand from (a+b)^2

STEM land 3rd birthday!!

On 16th October 2018 we celebrated STEM land’s 3rd birthday in Udavi school. A week ago children were back from their first term holiday and worked on creating projects to present during the celebration. Some children attended the scratch course conducted during the vacation and created projects on Scratch.


It was quite a busy morning, both children and STEM land youths were so energetic and were decorating and organizing the place. 9th graders from Udavi decorated the entrance of STEM land with colorful Rangolies. Tables were placed outside STEM land and children checked out the games and puzzles which they were interested and played them with the visitors.


Children and Teachers from Aikiyam and Isai Ambalam schools came. We commenced the event with a samosa and a banana for each.


It was a bit drizzling but we continued the celebration and STEM land youth gave an introduction about STEM land by saying the universal values and principles of STEM land, ground rules, learning rules and about the courses that we offer for youth in and around Auroville. One of our volunteers in STEM land who come to learn have also shared her experience and what she has learnt.


Then Sanjeev from Udavi followed by teachers from Udavi, Isai ambalam, Aikiyam  and Bridget from Thamarai lit up the lamp and begun the celebration. In front of the staircase the flames of the candles were beautifully dancing and saying “STEM LAND” and warmly welcomed everyone. Children’s projects were recorded and were projected.


Children from Isai Ambalam have also brought their projects and their EBD models. They were explaining their projects, demonstrated light sensing robot which they’ve made within two days and were also playing strategic games. Few Isai Ambalam  children also played games which were programmed by Udavi school children on Scratch.  The volunteers have also presented their project which lights up the LED serial lights only when someone stands in front of it and gets turned off automatically when no one is there.


It was unexpected and touching that the children from Isai Ambalam school have baked cakes and wrote STEM on them and brought them to Udavi. Visitors from Auroville and few people who have attended the courses offered by STEM land have also visited and played games with children. They went around STEM land and got to know what all we do and how children learn in STEM land and also solved some cast puzzles.

Everything went smoothly and the celebration ended with the same energy along with children’s drumming. It was fantastic to see both Isai ambalm and Udavi children drumming together. Children and visitors danced and enjoyed the celebration.

Holiday Scratch Course

~saranya

During the exam holiday we conducted basic scratch course for children. 7th graders are new to STEM land they donot know to make a project in scratch so we combined Isai Ambalam children with Udavi children. Day by day we are able to see changes from children. When we collaburate with other children it was really fun and learn. Some children from 8th grade also joined with us for helping. They helped their buddies and also they showed the task demo with children. From that demo children got an idea to complete their tasks.

Day 1: Ask question

We asked children prepare few question that can related to anything. They did it then we asked children to use funtions from scratch now use spirite and ask questions and also play it with others. 8th grade children showed demo of the task. Every children did well.


Day2: Shapes to Mandala

We asked children how many shapes do you know draw it by using scratch from that make a mandala and we have given one clue for them that is repeat function for mandala. When they did it they were so happy and theyn shared with other also.


Day3: Maze Game

We asked children to know how to play maze game.  From this we have given clue for children to make maze game. 8th grade children showed demo of this then many children made different kind of maze games. That was really awesome and everyone were enjoyed a lot. We gave chance to evryone to share their projects.

Day4: Adding life and score to everyone

Maze game they did for play at one time then we asked children to add life and score. We asked children to use data for that the did well and they taught others also.

Day5: Arc function and Write function

These two function is used to reduce our coding part. This will make our work easy.  The task is children should use these function. Children did it and also they made many projects.

We start and end with circle. I noticed that when we collaburate with other children peer learning was happened and we made new relationship with Udavi and Isai Ambalam. I felt this exam holidays helped for others and also we made the holiday meaningful.

Salem conference (Mind mingle)

Sanjeev and I were part of an educational conference held in Salem called the “Mind mingle – inspiring schools to be innovative”. People from different background gave speech on their views on education.  Garry Jacobs talk was very inspiring where he wanted to bring in values in education.

We gave a brief introduction on STEMland. Then we held a small workshop on Stewardship for all the speakers and participants. We received a good response from everybody.

Personal reflection: Being part of such a rich (knowledge) crowd was very different. I was nervous in the beginning but I talked from my possibilities. Listening to other speakers was very inspiring and motivating.

Heidi Interview

Heidi interviewed Sanjeev. Heidi came up with few interesting question for sanjeev. Sanjeev answered her question it was  interesting for us.

She asked about Stewardship for new emerging workshop with Monica Sharma and He talked about Leadership In Action Program(LIAP).

He shared his experiance of the stewardship tools and how it helped him to progress of who am I? What do I care for? What is my stand and social fear? etc…… He shared his experience of vipaasana meditation. He shared that what he learnt from these workshops.


Makey Makey

~saranya

In STEM land children have their freedom to work on their own. End of the week children will share their projects to everyone. From this presentation I am able to see peer learning is happening in STEM land.

Every week children are having project presentation through this children confident level is increasing and it made a path to build 7th grade their project.

Baranidharan from 9th grade he made project on drums and piano by using makey makey kit. He just used the makey makey kit and  few one rupees coins to play drums and piano. He did coding in scratch. Then he used  makey makey and scratch program together.

It was very nice to see his project & 7th grade also excited about his projects and 7th children also got a chance to play piano and drums.

Sets game

A few girls from 10th grade had build a physical game with a chart representing 3 venn diagrams (governed by 3 randomly selected rules by one team) and a set of 27 games pieces (3 shapes, 3 sizes and 3 colors). The other team players needs to place a piece on one of the areas and ask if it fits there. The goal is to figure out the original rules selected for each circle of the Venn Diagram and demonstrate the understanding of set theory. A few 9th grade children choose set language as their goal as they played with this game. The game helped them in understanding the intersection of two and three sets. Then to make the game more interesting they modified the rules to guess the right answer within few attempts.

A 9th grader took this to the next level and did not just wanted to play the game on the chart but wanted to create a Scratch game to do the same. Children who did not know, and had the set language as in their syllabus learnt the concept by playing his game.

How to find a value of Capacitor

A capacitor is a two terminal passive element which stores energy.

There are two types of capacitor.

1. Ceramic Capacitor:

           Ceramic Capacitor

– These are small,non-polarised in yellow or orangish  in color.

How to identify these capacitor values:

The value is printed in three-digit code. The first two digits are the two most significant digits of the value, and the third digit is the exponent on the 10. The value is expressed in terms of pico-Farads.

For example,

104 becomes “10” followed by “0000”(four zeros) or 100000 pF, which can be written as 100 nF.

2. Electrolytic Capacitor

           Electrolytic Capacitor

– larger cylindrical bodies that look like small soda cans

– higher capacitance than ceramic capacitor

– they are polarized


How to identify these capacitor values and its polarization:

The value is followed by the voltage rating(maximum DC voltage the capacitor can withstand without damage).

Polarization:

There are two polarity indicators on an electrolytic cap:

1. The stripe painted on the body usually denotes the negative lead.
2. The positive lead is longer than the negative lead.

For example,

1000uf 25V – Thousand micr farads and 25 volt.

                          Capacitor Code Sheet