9thPlan – 2015/16
Last year 2015/16 we asked the children to fill out their daily plan on an excel sheet. The above link downloads the excel. This year 2016/17 the children are making weekly plans and not daily plans!
9thPlan – 2015/16
Last year 2015/16 we asked the children to fill out their daily plan on an excel sheet. The above link downloads the excel. This year 2016/17 the children are making weekly plans and not daily plans!
You can change multiple file extensions using command line. I had 20 odd xlsx files which I want to change as csv files.
You can use this command: ren *.xlsx *.csv
Step 1:
Change to directory you want to change the file extensions.
Step 2:
Enter the following command: ren *.existing file extension *.new file extension you want
We started to build the robot to solve rubik’s cube with python as platform in the STEM land. At that time Yuvaraj (8th grader) wanted to solve it. He searched for the algorithm to solve rubik’s cube. It took him 3 classes to solve the cube for the first time by following the steps. He was very happy and excited about his work and he showed it to other students also. Initially they were all looked at him as Genius and that moment made him to to solve the cube without looking at the algorithm after the continuous one week of hard work with passion. Suddenly, this made an impact in STEM land activities. Every child wanted to learn it but the bad news was we had only one cube in the STEM at that time. So Sanjeev bought some cubes (bumb cubes, speed cubes and 4×4 cube) for STEM land through Asha grant. Almost all the students started to work on it. They helped each other to solve it regardless of grades. Presently there are 18 students who can solve rubik’s cube and few students can solve less than 2 minutes. For me its all about inspiration. None of us asked Yuvaraj to solve it but he took the effort on seeing us building robot. No one asked other students to pick it up but they picked it up on seeing Yuvaraj solving the cube. This is how STEM land works…. The following video was demonstrated by Rathinavelu.
We spent two weeks as interns at Aura semiconductors, Bangalore. Staying, food and travel was taken care by Aura.
Things that I noticed differently:
I saw people working for a long time from 10 to 13 hours a day. They worked very focused and as teams. Problems were brought together and discussed between them. I noticed that they did not move to the next solution instead they stayed with the problem. People reviewed their work often.
What I learned:
This was a learning experience for me and I leaned a lot by simply noticing other people work. People had their own style of coding. I learned to think logically. This really helped me to move faster (than before) and I noticed that logical thinking helps a lot in coding. My four main learning are
1. Never hard code
2. Make the code as general as possible
3. Comment and give meaningful names to your variables so that it helps others understand what the line does. Even it helps my own self if I look at the code after some period of time.
4. Write down all the comments first before I start coding and have an idea of what the code should have. Write it in simple English.
In fact I learned lot more other stuffs.
What will I do differently:
I will interact more with my team and learn from each other.
Other cool stuffs of Bangalore:
There are lot of places where you can hang out. Living is too expensive. There are many job opportunities for graduates in Bangalore especially Engineers.
In the beginning we used LEGO software ( like scratch – stitch commands together) to program the Mindstorm Robot. Now we switched to Python. Let see how to set it up. All we need is SD card (2GB-32GB)
Need to create ev3 environment in the brick ( like a brain of the Mindstorm) to support the python. Download the latest .xz image file for ubuntu (.zip file for windows) from the website https://github.com/ev3dev/ev3dev/releases
Copy the image on to the SD card through terminal:
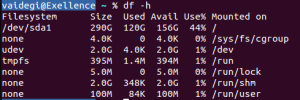
1. Make sure that your SD card is unplugged. Then run df. command: df -h. You should see something like this:
 2. Now insert you SD card and run
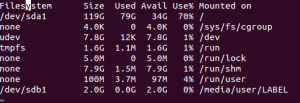
 df again. command: df -h

3. Unmount your SD card. If it has more than one partition. command: sudo umount /dev/sdb1
![]() 4. Download. command: xzcat ~/Downloads/ev3-ev3dev-jessie-2015-12-30.img.xz | sudo dd bs=4M of=/dev/sdb
4. Download. command: xzcat ~/Downloads/ev3-ev3dev-jessie-2015-12-30.img.xz | sudo dd bs=4M of=/dev/sdb
 Note: You can monitor the progress of this by running the following in another terminal. command: sudo watch kill -USR1 $(pgrep ^dd)
5. When copying the image file has completed, run command : sync
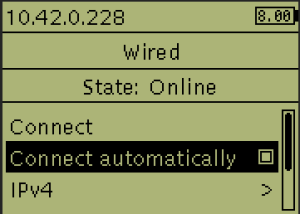
Boot the mindstorm. You will see the screen like this. If the voltage drops below 5V the brick will turn off. All not saved data may be lost. Keep in mind, that it may take a much longer time from 8V to 6.5V than from 6.5V down to 5V.
Connecting to the Internet via USB:
1. On your host computer, with the EV3 connected via USB, open up the network application indicator (1). You should already see an entry for LEGO Group EV3 (2), go to edit connection (3).
2. Add new network
3. Make sure Ethernet is selected and then click Create
4. Enter a Connection Name. The MAC address will always start with 12:16:53, so choose that one.
5. Then click on the IPv4 Settings tab and change the Method to Shared to other computers. Click Save when you are done.
 7. Then connect to the EV3 using ssh as shown in the picture. Command: ssh robot@ev3dev.local
Note: The default password is maker. You can change the password by typing psswd in the command terminal.
In next blog will see how to program Mindstorms in python.
Aura Auro Design Center
-Vaidegi Gunasekar
My stands are Perseverance and Agency (capacity to act in any given situation). AuraAuro laid a clear path for my career as well as social activities (teaching). In this duration of one year I learnt many things in Electronics (which I never even thought of in my under graduation) and Teaching (how to teach and classroom management). This gives me satisfaction on what I did in the entire course of learning.
As an Engineer
I can see myself that I’m growing as Engineer. I’m not doing the same work repeatedly. Everyday I’m doing something new or in different way. This makes me think, engage and apply thoughts based on my previous mistakes. AuraAuro also created space to collaborate and discuss when I face an issue or when I build something.
As a Teacher
As per my perspective, a teacher was one who give all the instructions (what to do and don’t). But Aura Auro broke that idea. It created a environment where I observe and guide the students instead of giving them each and every instruction to do something. In the middle I learnt being ‘effective’ is more important than being ‘nice’ to all the children.
I also learnt that “ If you want to understand something, change it. But, if you want to change something, understand it.”
We inaugurated the STEM land on 9th October 2015. It was one of my awesome moment in my life. I learnt a lot in that period( like organizing the materials, maintaining the STEM books, planning for inauguration and 3D printing).
STEM land inauguration started with lighting ‘floating candles’ followed by small speech on STEM.
Isai Ambalam & Udavi school students were put stalls on Robots, Puzzles, Strategy games, , Measurement equipments, 3D printer, Fraction kits, Scratch programming & Arduino programming. “Well beginning is half done“.
STEM Land is a place for ‘Learning’ which we are creating in Udavi school. The vision behind the STEM is learning based on Concepts, practical observation & abstraction. In short “Mediocrity to Excellence“.
It has large variety of materials ( Robot, Physics based materials & kits, Demonstration models, Electronic components & tools, variety of Measurement Equipments, Montessori & Jodo Gyan materials, Strategy games, Puzzles and Books). So we can engage all the students based on their capacity level without letting them feel overburdened or bored. Most of the students get enthusiastic and become active learners when they get into a new environment ( where the usual text books are absent). So it is added advantage of STEM.
This three students (7th Grade) have assembled the Robot parts (nearly 300 small pieces). They also programmed the Robot for a challenge I set for them (with guidance). Here they learnt how to be systematic (while assembling the parts of Robot). And became programmers when they started to program the Robot.
This student is an example of perseverance. Many people gave up when they were trying to solve this square puzzle (including me). One of the reasons was, we got bored. But he pursued till he reach it. Our curriculum needs this type of activities to empower students to use their creativity to solve problems, ask questions and continually learn.
Students need to be challenged. At the same time not be bored. I hope strategy games are one of them which satisfy this condition. And this made them think and observe keenly without supervision.